|
WebLogic 12.2.1.3 静默安装
前置1、weblogic下载
下载链接为:https://pan.baidu.com/s/1w2pBk9EQxWPAAir0MjW9Ng
提取码:erbq
weblogic版本环境为10.36,配套的jdk为1.6
官网:(下载贼慢)https://www.oracle.com/cn/middle ... logic/wls-main.html
前置2、安装jdk
weblogic安装需要jdk环境支持,所以需要先保证jdk环境已经安装
a)卸载原有jdk
可以输入java -version 查看系统是否已经含有jdk环境,如果自己没有安装,但是有输出jdk版本,说明系统自动open jdk了,个人建议卸载,通过rpm -qa | grep java命令查看带有java的文件
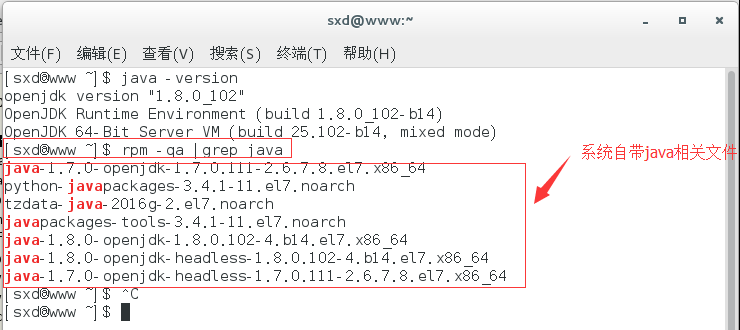
然后通过rpm -e --nodeps java-1.7.0-openjdk-1.7.0.111-2.6.7.8.el7.x86_64命令删除相关文件来卸载jdk环境,文件删除完毕后,输入java -version 检验是否卸载干净,如果提示未找到命令,则说明卸载干净
b)安装jdk
将下载包中的jdk环境拷贝至你需要安装的目录下,然后运行./jrockit-jdk1.6.0_45-R28.2.7-4.1.0-linux-x64.bin,即可安装,本篇博客主要讲解weblogic的相关知识,jdk的安装步骤就不详细讲解了。
1. 创建软件安装的response文件。
[weblogic@goya1 install]$cd /app/Weblogic/
[weblogic@goya1 install]vim /app/Weblogic/install.resp
[ENGINE]
#DO NOT CHANGE THIS.
Response File Version=1.0.0.0.0
[GENERIC]
#Set this to true if you wish to skip software updates
DECLINE_AUTO_UPDATES=true
#My Oracle Support User Name
MOS_USERNAME=
#My Oracle Support Password
MOS_PASSWORD=<SECURE_VALUE>
#If the Software updates are already downloaded and available on your local system,
#then specify the path to the directory where these patches are available and
#set SPECIFY_DOWNLOAD_LOCATION to true
AUTO_UPDATES_LOCATION=
#Proxy Server Name to connect to My Oracle Support
SOFTWARE_UPDATES_PROXY_SERVER=
#Proxy Server Port
SOFTWARE_UPDATES_PROXY_PORT=
#Proxy Server Username
SOFTWARE_UPDATES_PROXY_USER=
#Proxy Server Password
SOFTWARE_UPDATES_PROXY_PASSWORD=<SECURE_VALUE>
#The oracle home location. This can be an existing Oracle Home or a new Oracle Home
ORACLE_HOME=/home/weblogic/Oracle_Home
#Set this variable value to the Installation Type selected.
#e.g WebLogic Server, Coherence, Complete with Examples
INSTALL_TYPE=WebLogic Server
#Provide the My Oracle Support Username. If you wish to ignore Oracle Configuration Manager
#configuration provide empty string for user name.
MYORACLESUPPORT_USERNAME=
#Provide the My Oracle Support Password
MYORACLESUPPORT_PASSWORD=<SECURE VALUE>
#Set this to true if you wish to decline the security updates.
#Setting this to true and providing empty string for
#My Oracle Support username will ignore the Oracle Configuration Manager configuration
DECLINE_SECURITY_UPDATES=true
#Set this to true if My Oracle Support Password is specified
SECURITY_UPDATES_VIA_MYORACLESUPPORT=false
#Provide the Proxy Host
PROXY_HOST=
#Provide the Proxy Port
PROXY_PORT=
#Provide the Proxy Username
PROXY_USER=
#Provide the Proxy Password
PROXY_PWD=<SECURE VALUE>
#Type String (URL format) Indicates the OCM Repeater URL
#which should be of the format [scheme[Http/Https]]://[repeater host]:[repeater port]
COLLECTOR_SUPPORTHUB_URL=
2. 您还需要指定一个Oracle库存位置。创建文件:“/etc/oraInst.loc”的文件.
inventory_loc=/app/Weblogic/oraInventory
inst_group=weblogic
3. 开始静默安装
[weblogic@goya1 install]$ $JAVA_HOME/bin/java -Xmx1024m -jar /app/fmw_12.2.1.3.0_wls.jar -silent -responseFile /app/Weblogic/install.rsp -invPtrLoc /etc/oraInst.loc
最后如果看到如下信息说明安装成功。
The installation of Oracle Fusion Middleware 12c WebLogic Server and Coherence 12.2.1.3.0 completed successfully.
4. 创建域的response响应文件。
vim /app/Weblogic/create_domain.rsp
-----------------------------------------------------------
read template from "/app/Weblogic/Oracle_Home/wlserver/common/templates/wls/wls.jar";
set JavaHome "/usr/java/jdk1.8.0_241/";
set ServerStartMode "prod";
find Server "AdminServer" as AdminServer;
set AdminServer.ListenAddress "";
set AdminServer.ListenPort "7001"; //Weblogic管理平台监听端口
//set AdminServer.SSL.Enabled "true";
//set AdminServer.SSL.ListenPort "8002";
//We can directly create a new managed server.
create Server "Server1" as server_1;
set server_1.ListenAddress "192.168.76.20";
set server_1.ListenPort "8003";
//set server_1.SSL.Enabled "true";
//set server_1.SSL.ListenPort "8004″;
//Create Machine
create Machine "Machine1" as Machinename;
//use templates default weblogic user
find User "weblogic" as u1;
set u1.password "weblogic123";
write domain to "/home/demoapp/demo_domain";
// The domain name will be "demo-domain"
---------------------------------------------------------------------------
5. 静默方式创建域。
[demoapp@goya1 demo_domain]$ /app/Weblogic/Oracle_Home/oracle_common/common/bin/config.sh -mode=silent -silent_script=/app/Weblogic/create_domain.rsp -logfile=/app/Weblogic/creat_domain.log
如果看到下面的内容,说明域创建成功:
>> succeed: write Domain to "/home/demoapp/demo_domain"
6. 启动WebLogic 控制台验证
[demoapp@goya1]cd /home/demoapp/demo_domain/bin
[demoapp@goya1]./startWebLogic.sh &
|


 站长QQ
站长QQ


 发表于 2021-7-12 10:24:36

 置顶卡
置顶卡 沉默卡
沉默卡 变色卡
变色卡